Saturday, August 13, 2016

How to Children's Books


The topic of children's books is obviously too big to completely cover, but I do have a few tips that include:
  1. How to organize them (and avoid getting duplicate copies of titles you already own)
  2. How to get them on the cheap
  3. Just a few book recommendations

To start this out—as is book tradition—I'd like to make a dedication:

Book Dedication

Rileigh Smirl, Sydnee McElroy and Teylor Smirl are three sisters of the podcast Still Buffering. They discuss how the youngest sister teens now and compare it to how the other two sisters used to teen, or to put it more eloquently, as Rileigh says in their intro, it is "a sister's guide to teens through the ages."

Still Buffering Logo

Their episode titled How to Books definitely inspired my title, but it also got me excited about all of the books I look forward to reading to my now 22-month-olds. One book, in particular, that they mentioned, Sideways Stories from Wayside School, was a childhood favorite of mine and is so rarely known by people I meet—so I knew the Still Buffering ladies get it.

Besides being amusing and giving me that snuggly, warm feeling of love in my tum-tum, the sisters of Still Buffering have managed to attract a supportive, caring audience who never make you feel silly for sharing a thought in their Facebook group. I love those guys and the good vibes they always send out.

Now, on to business...


Catalog Those Books!
After my kids were born, grandparents and other family members asked me what children's books we already owned so they could avoid sending us duplicates. I honestly couldn't remember them all, which wasn't so great for me either when I did some book shopping of my own.

So sort those books on the shelf however you want—by author, genre, Dewey Decimal System, etc.—but put them in a shareable list to help you and your relatives out.

Google Docs
I add all of my books in a Google Sheet and share that file with my family members. Since it's digital, that means we can pull the list up on our phones for when we're shopping for books on the go-go. Sure, it's time-consuming at first, but it is worth it in the long run when you reap the benefits of avoiding duplicate copies of a book and having your library catalog at your fingertips.

Google Doc Book List
Each column can easily by sorted alphabetically in case you prefer to look something up by author versus title

libib.com
This website is what I used to begin my library catalog. It's a bit of a time-saver since I can simply enter the ISBN number of any book, and it will bring up all of that book's information: title, author, number of pages, date of publication, etc. You can even edit the information or add a picture of the cover in case anything is missing.

libib Book Details
book details from libib.com

It's easy to organize everything when you can also create different Libraries. I, for instance, have one for board books, one for paperback picture books, one for hardback picture book and will soon have one for chapter books.

Creating Libraries in libib.com

NOTE: I haven't tried it yet, but I thought it was worth mentioning that you can choose a library type other than books in case you want to catalog more of your life: movies, video games and music are also available.

This service is free, but they also offer a Pro version that you have to pay for. The biggest advantage that I can tell is that you can get these lists "published" and accessible to others (HINT: this is where Google Docs comes in).


List Tools, Assemble!
So if you start with libib.com but want to take advantage of the free sharing abilities of Google Docs, then you've come to the right place.

Under Settings, select Libraries and click on Export a Library (.csv). Select the library you want to export and hit... wait for it... Export Library.

Exporting Library on libib.com
Easy as 1, 2, 3... 4, 5

Once your file is finished downloading, you can Import it into your blank Google Sheet.

Import to Google Sheet

Will it be a bunch of gobbledygook at first? Oh, so much yes.

Raw Imported File
AAAHH—the gobbledygook!!!

But you delete whichever columns you don't need, put some visual hierarchy in there by increasing the size and boldness of the title row, maybe add one column that defines which library it came from and BOOM—Sensical City.


Does this seem like a lot of work for a list of books? Maybe. But that's just because you've never logged all of your stuff before, lazy bones. And, again, once it's done, the rewards can be reaped.

Also, keep in mind that from here on out, you'll only have to log one book at a time as you gradually gain more, and a Google Doc does not need to be shared again once it is updated. It automatically shows everyone the most up-to-date document that you have made.


Where Does He Get Those Wonderful [Books]?
Everyone has their little bargain secrets, but what I've found to be super helpful for just a bunch of baby books at a low cost is a used book sale. I actually have two coming up this month in my town that I'm excited to return to. One is at my local library and the other is held by a non-profit organization called Books For Keeps.

Why are books sales like these so awesome?

  1. The money goes back towards the community
  2. You likely have a local event like this wherever you are (check your library at least)
  3. Most books are no more than $2 or $3 at the most
  4. They both have a Bag Day* (my favorite)

*Bag Day usually means you pay a flat fee ($5 for a grocery bag in one case) and you get to fill a bag with as many books as you can. Be warned: Bag Day is usually the last day of the event after the bigger titles have been swiped, so if you're looking for something in particular, it might be worth it to go sooner and pay the whole two or three dollars. But when you just need a bunch of simple board/picture books for a little baby—well, let's just say that you can fit a lot of small books like those in an average-sized bag.

Don't be discouraged though. You can still find plenty of good-quality books on Bag Day. I've gotten classics such as Dr. Seuss and Berenstain Bears, for example. I've also found a bunch of other gems that I never knew existed like The Giant Jam Sandwich—whaaaa? Yes!


So Google you some local money-saving book events. And if you're worried about used board books being icky, just wipe it down with some 3% hydrogen peroxide on a cloth. I've learned recently that hydrogen peroxide seems to be more effective as a disinfectant on inanimate surfaces—like baby books—than on cuts or scraps on people (thanks, Sawbones!).

Recommendations
This list could quickly get way out of hand, so I'm going to stick to what my 22-month-olds are into right now (all are board books).

What the Cool Babies Are Reading
When babies are less than two years old, they're not as into a good story as moms and dads might be. What appeals to my son and daughter are the books with pretty pictures, minimal words—so we're not waiting too long to turn a page—and any kind of interaction with the book (feeling textures, turning pages, flipping peek-a-boo flaps, counting objects, etc.).

Peekaboo Sophie!
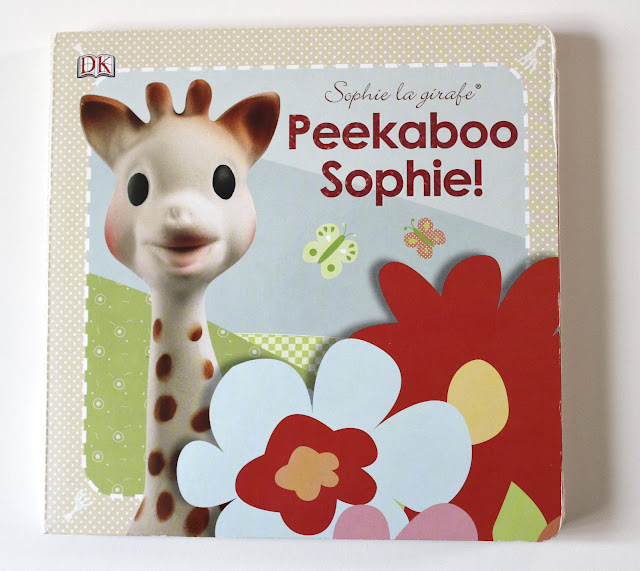
Peekaboo Sophie

Besides every page having a peek-a-boo flap, there is additional interaction involved, such as touching Gabin the Bear's squishy nose, tickling Sophie and her soft felt spots or—my children's favorite—popping the glittery bubbles above Margot the Turtle's bath.

Peekaboo Sophie - Bubbles
Is Margot the Turtle behind the bubbles? You're darned right she is.

Where is Baby's Belly Button?
Where Is Baby's Belly Button

Babies usually love looking at other babies, which is every page of this book. And because each page has a baby's face, it's an easy way to ask your child, "Where is the baby's eyes?" or "Can you point to baby's nose?" as often as you like in addition to the specific body part on which the page is already focused.

The baby has another set of arms (and cup) behind her first pair of arms (and cup)!


Dream Snow
Dream Snow

I haven't met an Eric Carle book I didn't like—even for just the beautiful illustrations alone. As a bonus, this one focuses on counting to five and has those peek-a-boo flaps that my kids can't seem to get enough of.

Dream Snow - Cow
The farmer in this book is a nice guy but not the most creative by naming his animals One, Two, Three, Four and Five

It is technically a Christmas book, but we can do Christmas in July or August or September—or any time we want! The textured snow on the cover is another nice touch (whoa—accidental pun!), and the kids and I make sure to Ooo! and Ahh! over them every time we start or finish the book.


Poke-A-Dot! What's Your Favorite Color?
Poke-A-Dot

This has animals, colors and counting, but the best part is the "POP-A-TRONIC technology."

Poke-A-Dot - Back
The back actually claims "POP-A-TRONIC technology." I can't make this up.

Every page—even the cover—has little plastic bubbles for the kids to poke, which then give off a satisfying pop sound. And every pokeable bubble aids in counting the color-themed animals.


Alphaprints: Colors
Alphaprints: Colors

The two big reasons I like this book are the vibrantly colored illustrations and the incorporation of textured fingerprints into the images of the animals.

Alphaprints: Colors - Purple

One of the reasons it appeals to my kids is the way the pages are stacked and have a shiny colorful edge—the stacked pages make it much easier for the kids to turn a page on their own, which is definitely one of their favorite parts of reading a book to being with.


My Numbers / Mis Numeros
My Numbers Mis Numeros

It's a simple counting book with simple but colorful illustrations, which I say as a positive—the simplicity actually makes it easier to focus on the objects to count.

My Numbers Mis Numeros - 10

Every page has the number and object(s) to count in both English and Spanish. It's a nice introduction to a second language that any parent with any level of Spanish-understanding should be able to read.


Super Heroes: Colors, Shapes, and More!
Super Heroes: ABC, 123
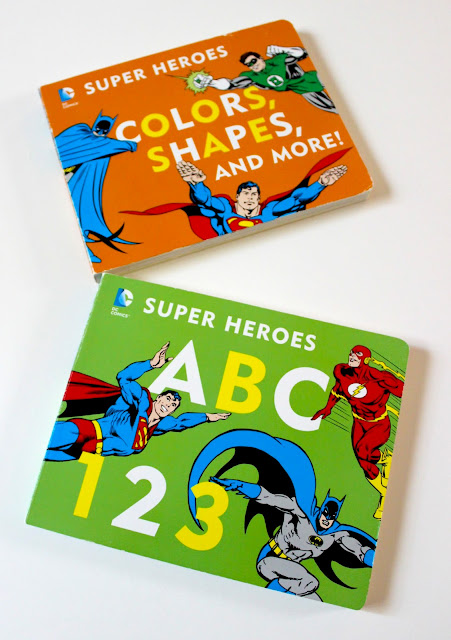
Super Heroes Baby Books

My husband and I are both into super heroes, so it is only natural that we use them to teach our children different colors, shapes, the alphabet and numbers. It's fun to go away from the norms of child-oriented words like kite or kitten to represent the letter K and showing that it can stand for Kryptonite as well.

Super Heroes Baby Books - K for Kryptonite

As an added bonus, my husband has been pointing out the names of some of the super heroes as he reads these books to my children, which they seem to be really into. Can my kids say "blue" or "circle" yet? No. But my son and daughter can identify and can say "Batman" and "Superman."

Here is my daughter saying "Superman" and rushing over to the book shelf to request the Superman books.


Winry's version of "Superman" comes out a little closer to "Su-mon," but you get the idea.


Star Wars: ABC
Star Wars: 123
Star Wars: Colors
Star Wars Baby Books

If the parents are into Star Wars, which we are—much like the super hero books mentioned above—this is another fun way to introduce the basic colors, numbers and letters to children. Of course, you may have a problem like I do of the book mentioning that R2-D2 is a robot instead of a droid, but I know they were just trying to use as many words bringing with R as they could, so I let it slide.

The kids seem to like Yoda and Chewbacca the most—without having seen the movies yet—probably because their faces are featured bigger than most on the pages, and the kids have fun pointing out Yoda's or Chewy's eyes, mouth and nose.

Star Wars - Yoda Green
They can't say "Yoda" yet, but we'll get there.

Another perk of these books is the larger-than-normal dimensions for a board book (9x9 inches). Because the pages were so big and fun to turn and because the pictures on each page were also large, these books seemed to more easily hold my kids' attention. They were the definite favorites for a long time for this very reason and one of the first books that they both sat through until the end.


Mommy and Babies Reading
I love having a lap full of babies!


Tuesday, June 28, 2016

Box Fort Fun

I believe that building a box fort needs no reason; however, three sets of circumstances happened to converge at the right time to make it happen:

  1. We had the boxes
    • Sometime around the kids' first birthday last October, we started accumulating a lot of larger cardboard boxes. Some were from our own practical purchases—upgrades from infant carseats, for example. Others were from grandparents, aunts and uncles showering the twins with gifts in excitement for their first birthday.
  2. We needed a functional baby-blocker
    • Once they became mobile, the kids discovered that they loved grabbing books off of their bookshelf, and the clothes hamper that used to block it became ineffectual and too easy to knock over.
  3. Box forts are awesome!
    • I don't care how old you are, if you don't get excited at the thought of a box fort, then you have no pulse. And isn't having the perfect excuse to indulge your inner-child half the fun of having kids?
Box Fort - Glowing
Behold the glory of the Box Fort (complete with two "rooms" and stuffed animal crow's nest)!

Bookshelf Blocking
Bookshelf blocking success.

We kept ours nice and simple, but the internet sure has some awesome box fort ideas in case you're feeling more ambitious—Pinterest, for example, has them in spades.

Box forts on Pinterest
Box fort ideas on Pinterest

Ours was made up of just three boxes of varying sizes (a bulk pack box of wipes, a carseat box and a large box previously containing birthday presents for my kids), duct tape and dreams.


Fortunately, all of the boxes were sized to fit perfectly within one other.

Cut Slit on Medium Box
Cut on medium box

I simply used a box cutter to cut an opening up one side of the medium-sized box. The length of the cut only goes up as far as the height of the largest box. I then interlocked the medium box and large box by sliding the cut slit over one of the large box's ends.

Box Assembly

Both the medium-sized box and the largest box have openings cut into them that are roughly 19 x 19 inches. This is large enough for the kids to easily crawl through.

View from the top. Main opening on the left with Winry sitting under the second opening, March 2016

Box Openings
Henry peek-a-boos over the top, then crawls through the opening, March 2016

I also wanted to leave the tops open so light wouldn't be an issue. It also gives the kids the opportunity to peek-a-boo over the top.

For the crow's nest, I simple folded the top flaps of the smallest box over the sides of the medium-sized box and taped it down. It easily displays a few stuffed animals, including our two My Pals toys.

Stuffed Animal Crow's Nest
Stuffed animal crow's nest

NOTE: I highly recommend taping up all sides/corner of the boxes and gaps created from the box flaps. If your kids are anything like mine, they will pull at any exposed opening and unintentional destroy their fortress.

We built this box fort back in March when the kids were about 17 months old. They still love to play in it. They've also discovered the second "room" of the fort to be an excellent hiding place when Mommy asks if they're ready for their nap.

... It's a good thing you kids are cute.

Henry invites you in, March 2016

Winry and Mommy standing in box fort, March 2016

Friday, May 6, 2016

Zucchini Carrot Mini Muffin Recipe

The wonderful site that is Pinterest led me to a yummy muffin recipe (from It's Naptime Somewhere) that was recommended for children and involved zucchini. The main ingredient caught my attention, and since I already had what I needed just sitting in my kitchen, I had to try it.

Zucchini Carrot Mini Muffins
Veggies + Muffin = Delicious

And try it I did with just a few minor tweaks to the recipe. The mini muffins are a wonderful size for babies who are eating finger food—although, I usually break it into smaller pieces since my 18-month-old twins are used to cut up chunks of food. They are also a nice, tiny size for an adult snack.

Another perk is that they contain no eggs, which is great for two reasons:

  1. Little ones with an egg allergy can enjoy these muffins
  2. Should your oven not be the most reliable* and fail to thoroughly cook the gooiness out of the muffins, you won't have to worry about salmonella

*My baking has been much more accurate ever since we got our Hamilton Beach oven thermometer. In case you're not familiar, it just sits or hangs inside of the oven and gives you the actual temperature reading. It turns out that our oven needs to be set about 25 degrees higher than what we actually want to get the right temperature. And it typically needs more time than the preheat timer suggests. I can't believe that I have lived most of my life not knowing these exist. Some are pretty inexpensive and should do the trick.


INGREDIENTS

  • 1-½ cups flour**
  • 2 tsp. cinnamon
  • 1 tsp. baking soda***
  • 3 bananas
  • ½ cup applesauce or apple purée
  • 2 tsp. vanilla
  • ¼ cup sugar (or sweetener of your choice)
  • 2-½—3 cups of zucchini and carrots (this works out to one zucchini and about 15 baby carrots)

**Using all purpose flour is fine. I ended up doing 1 cup of the all purpose and ½ cup of coconut flour.
***The original recipe calls for baking soda. I accidentally used baking powder. Really, either one is fine for this recipe since both help baked goods rise. I even looked up the differences and found a helpful chart in this article.


INSTRUCTIONS

Set oven to 350 degrees Fahrenheit.

Combine flour, cinnamon and baking soda into a bowl, and set aside.

In a separate bowl, mash your three bananas—a potato masher works great.

Mashing Bananas

Stir in the applesauce, vanilla and sugar.

You can grate your zucchini and carrots, but I prefer to chop them up finely in my food processor. The ratio of zucchini to carrot is typically higher, but you can adjust your ratio to whatever you want. Just dump the chopped up pieces into a measuring container to check that you have the overall correct amount.

Chopped Zucchini and Carrots

Throw the tiny pieces of zucchini and carrot into the wet mixture bowl and give it a good stir. Then slowly stir in the dry bowl mixture until your have one nice, colorful bowl of goop.

Grease your muffin pan and generously add mixture to each slot. It should be just the right amount for one tray of 24 mini muffins (or one tray of 12 regular muffins).

Filled Mini Muffin Tray
It's normal for the mixture to mound over

Bake for 30–40 minutes. You can check the centers with the toothpick trick—if it comes out clean, it should be done. But also take comfort in the fact that no eggs means no salmonella, and some gooiness in the middle won't hurt. The original recipe also recommends letting them cool completely to minimize gooey centers.

Middle of Mini Muffin

My favorite thing about trying this recipe for my kids was that if it turned out they didn't like it, then I had a whole mini muffin tray of treats just for Mommy. Yum!

Turns out that they do like it, but that doesn't mean I don't get to sneak one every now and again.

One Mini Muffin

Pile of Mini Muffins

Cooked Mini Muffins in Tray


Saturday, March 26, 2016

Dinosaur Egg Crispy Rice Treat Recipe

As miraculous as it is for bunnies to lay eggs in the first place, they're much too small for my tastes. I, instead, went for a dinosaur egg—a much rarer and delicious Easter treat.

Dinosaur Egg Crispy Rice Treat in Basket

I happened upon a dinosaur egg Rice Krispie treat recipe when I was looking for a fun movie night snack for a showing of Jurassic World. I only made a few alterations from the original (mostly slightly increasing the amount of marshmallows and Oreos).

Instead of making a few small eggs, I like to make one larger one that's more appropriately sized for a dinosaur, which is about nine inches long and can fit the entire recipe.

Nine Inch Egg Mold
Nine-inch egg mold

    Now, HOLD ON TO YOUR BUTTS.

    INGREDIENTS
    • 6 cups of Rice Krispies* (or half of a 12 oz. cereal box)
    • 9 Oreos* 
    • 5–6 cups of mini marshmallows (or one 10 oz. bag)
    • 3 tbsp. of butter
    *Or in my case, I use the off-brand items, Crispy Rice Cereal and Chocolate Sandwich Cookies.


    INSTRUCTIONS

    You'll need two large bowls: one for the crispy rice and chocolate sandwich cookies and one for the marshmallows and butter. The one for the marshmallows and butter needs to be microwave safe, and I recommend something in size that's similar to a 2.5 quart Pyrex bowl.

    Crispy Rice and Oreo and marshmallows and butter bowls

    Put Oreos in a Ziplock bag and crush with a mallet or rolling pin into delicious, little pieces.

    Rolling Pin and Oreos

    Oreo Pieces
    Dear chocolate sandwich cookie pieces, I will eat you. Sincerely, Me.

    Combine Oreo pieces and Crispy Rice Cereal into first bowl, and stir mixture. Put marshmallows and butter into your large, microwave-safe bowl and heat in microwave for 45 seconds. Remove, stir and heat for another 45 seconds.

    Remove and stir until mixture is smooth.

    Melted marshmallows and butter

    Add the cookie and cereal mixture into the yummy melted mixture bowl and stir thoroughly.

    Now, press mixture into the mold of your choice and allow to cool.

    NOTE: If you decide to sculpt it into your own egg (or other) shapes, use something heat resistant like aluminum foil to form around your treat shapes to keep it from falling apart while it is still warm and malleable.

    You'll probably want to cut the giant egg into pieces when serving...

    ... Or just wait until life finds a way.

    Dino Egg Treat Hatching
    It's a baby dinosaur!


    Thursday, March 10, 2016

    Cauliflower and Spinach Topper Recipe

    After looking up ways to serve cauliflower as finger foods to babies, I found and made alterations to a cauliflower bake from a website that has a few different cauliflower baby food recipes.

    The biggest change was that I added a bunch of spinach and more Parmesan cheese and made it more of a topper than a lone finger food. It's actually quite yummy for adults too—I've tried it on a few different things and as a side.

    Cauliflower and Spinach Finger Food
    Cauliflower and spinach as finger food

    MAKING THE STUFF
    Frozen Spinach and Cauliflower
    Frozen spinach and cauliflower (12 oz. bags)


      INGREDIENTS
      • One 12 ounce bag of frozen cauliflower
      • 2 tbsp. butter 
      • ½ large yellow onion
      • 2 tbsp. all purpose flour
      • 1 cup whole milk*
      • Half of a 12 ounce bag of frozen cut leaf spinach
      • ¼ tsp. garlic powder
      • ¼ tsp. basil
      • black pepper to taste (I used about to ¼ tsp.)
      • ¼ cup bread crumbs
      • ¼ cup Parmesan cheese
      *Whole milk is only recommended if your child is at least 12 months old. You can try substituting in formula or breast milk if your child is younger.

      NOTE: I prefer using frozen cauliflower and spinach because it is convenient and easy to store in case I don't cook with it right away. You can use fresh vegetables if you prefer. Just make sure that the spinach is properly chopped and the cauliflower is in small enough pieces so little ones can easily eat it.


      INSTRUCTIONS

      Cook cauliflower until nice and tender (another advantage of these frozen bags is that they are made to be steamed in the microwave).

      Meanwhile, melt butter in a pan on medium to low heat, and sauté onions.

      Switch to low heat. Blend in flour and slowly add milk until you have a smooth mixture.

      Add spinach (thawing beforehand is not necessary) and stir occasionally until it is soft and cooked. Turn the heat back up to medium-low if necessary. Stir in garlic powder, basil and pepper.

      Spinach Mixture
      Spinach and friends on the stovetop

      Drain cauliflower and place in a 7 x 11 inch casserole dish. Pour spinach mixture on top. Sprinkle top with bread crumbs and Parmesan cheese.

      Spinach and Cauliflower - Before Baked
      Generous amounts of Parmesan cheese (with bread crumbs) sprinkled on top

      Bake at 375 degrees Fahrenheit for about 20 minutes or until top is lightly browned.

      Spinach and Cauliflower - After Baked
      Nice and lightly browned on top

      EATING THE STUFF
      My kids have tried this between the ages of 12 months and 16 months and have not been huge fans of eating it directly as a finger food (probably because it was a creamier texture than they were used to handling). So I cooked up some rotini pasta that I knew they liked and added it as a topper. Not only did it work, but I had some cauliflower, spinach pasta myself. It was yummy.

      Cauliflower Spinach Pasta
      Eating cauliflower spinach pasta with the kids

      Winry and Henry Picking Up Cauliflower Spinach Pasta
      Winry (left) examines each noodle while Henry (right) prefers to just dig in, February 2016


      Winry and Henry Eating Cauliflower Spinach Pasta
      The kids chow down, February 2016

      I've also eaten it as a side dish and tried it once as a topper to a turkey burger patty. So I highly recommend topping a bunch of toddler-friendly and adult-friendly foods with this cauliflower and spinach mixture. Enjoy!

      Cauliflower Spinach Topper on Turkey Burger
      Cauliflower and spinach topping a turkey burger for Mommy (with cranberries sprinkled on top)


      Saturday, February 13, 2016

      'We Feet Daddy' Valentine

      Footprint Heart Close-up
      From the foot to the heart

      This week's craft is inspired by Pinterest.com and its topic containing a bunch of Valentines made with baby footprints or handprints.

      Pinterest Baby Print Valentines
      Baby Print Valentines from Pinterest.com

      As cute as the bum-print idea is, I happen to find my one-year-olds' extremities to be super adorable, so I thought it would be a great idea to make a footprint Valentine for the father of my twins. I especially like the idea of taking one footprint from each of them and combining them into the shape of a heart.

      Footprint Valentine Supplies
      Supplies
      This is just what I used. Obviously, variations can easily be applied

      • black and red acrylic paint*
      • vellum (or semi-tranluscent) paper
      • Scotch tape
      • small, thick book
      • sponge
      • scissors
      • paint brush
      • Elmer's glue
      • Mod Podge
      • glitter
      • puffy paint
      • toothpick
      • 8 x 10 inch float frame**
        *I recommend water-soluble acrylic paint so it can easily be removed from baby's foot.
        **A float frame is just a picture frame with two pieces of glass that are meant to sandwich the picture in rather than having a solid backing. I got mine at Michael's.

        Michaels Float Frame
        Float frame from Michael's


        • Oh yeah, and don't forget those little feet—super important
        Baby Feet
        Henry's foot (left) and Winry's foot (right), February 2016

        One Small Step...
        The first step (pun intended) in this process is getting the footprints from the tiny people. This can be a little tricky since mine are only about 16-months-old and not the best at staying still. I recommend doing it when they're strapped into their highchair and distracted by something yummy.

        Winry Feet in the Highchair
        Gimme that foot, you little face

        I used bright red acrylic paint for Winry's foot, and mixed a little black in to make a darker red for Henry's foot. Use the sponge to apply the paint evenly over the foot. I would pat it with the sponge too so you don't have paint streaks showing up in the footprint. Keep a damp cloth handy to wipe foot off once you're done before baby has a chance to toe-paint anything.

        Pressing Tip: To make the foot-pressing easier, I lightly taped the vellum paper onto a small book so I had something flat and substantial to press the foot against.

        Paper taped to book
        Paper taped to book

        Also, make sure you have more than one sheet of paper handy in case the first try doesn't turn out well. Babies like to throw challenges your way now and again.

        Footprints in paint
        Paint footprints on vellum paper

        Once you get some good ones, let the prints completely dry. Cut them out however you like once they're ready.


        Add Some Sparkle
        The classy thing to do would probably have been to place the footprints into a heart shape in the float frame and maybe paint a simple heart around them, but I found puffy paint and glitter, so the classy option was immediately voted down.

        First, I figured out how I wanted the cut-out footprints to overlap and dabbed a couple of dots of Elmer's glue to the backs of the vellum paper in order to tack it down onto the back sheet of glass from the float frame.

        Glue Warning: You may want to keep these dots of glue small or possibly brushed out a little. I kept mine in dot form and later realized that they made the vellum paper wrinkle a little where the glue had made contact since it was a little too much concentrated goop in one area. Double-sided tape may be a better option.

        I then brushed Mod Podge into a heart shape around the mounted footprints and sprinkled on the glitter.

        Brush on the Mod Podge
        Be quick and generous with the Mod Podge so that it doesn't dry before you get a chance to glitterize it

        Glue to Glitter

        After letting that dry and removing the excess glitter, I painted the words above and below the feet and added a different color of glitter while the paint was still wet.

        The footprints and glitter are contained inside of the frame. After everything dried, I placed the second sheet of glass on top of my glittery art and placed everything into the frame.

        Framed Footprints - Puffy Paint Angle
        Puffy paint for the outside—I wanna touch it!

        The puffy paint is applied last on top of the front of the glass to add a little depth. I simply traced the shape of the heart and added a few dots. I made a few streaks in the puffy paint heart with a toothpick.


        Ta-da!
        We Heart Daddy Framed Footprints
        We Heart (or Feet) Daddy

        Happy Henry
        Henry says, "Happy Valentine's Day, Daddy!!!"